E13 | Split Water Heater, Attic Ladder | Ask This Old House
Season 24 Episode 13 | 23m 42sVideo has Closed Captions
Installing a split heat pump water heater; houseplant pests; installing an attic ladder.
Ross Trethewey upgrades a home to a solar-assisted split heat pump water heater, ideal for cold climates. Kevin O'Connor and Jenn Nawada discuss 3 common houseplant pests- mealy bugs, spider mites, and fungus gnats. Jenn shares some simple tricks to banish them. Nathan Gilbert solves a tough attic access issue by installing a new hatch and pull-down ladder.
Problems playing video? | Closed Captioning Feedback
Problems playing video? | Closed Captioning Feedback
Funding for Ask This Old House is provided by The Home Depot, Renewal By Andersen, and ChipDrop.
Support provided by:


E13 | Split Water Heater, Attic Ladder | Ask This Old House
Season 24 Episode 13 | 23m 42sVideo has Closed Captions
Ross Trethewey upgrades a home to a solar-assisted split heat pump water heater, ideal for cold climates. Kevin O'Connor and Jenn Nawada discuss 3 common houseplant pests- mealy bugs, spider mites, and fungus gnats. Jenn shares some simple tricks to banish them. Nathan Gilbert solves a tough attic access issue by installing a new hatch and pull-down ladder.
Problems playing video? | Closed Captioning Feedback
How to Watch Ask This Old House
Ask This Old House is available to stream on pbs.org and the free PBS App, available on iPhone, Apple TV, Android TV, Android smartphones, Amazon Fire TV, Amazon Fire Tablet, Roku, Samsung Smart TV, and Vizio.
Keep Exploring


This Old House Insider Newsletter
Get This Old House exclusive stories, tips, and behind-the-scenes information delivered right to your inbox every month.Providing Support for PBS.org
Learn Moreabout PBS online sponsorship♪♪ Kevin: On "Ask This Old House," our experts travel across the country to answer questions about your house.
♪♪ Today, Ross discusses the advancements in water tank technology and works with a homeowner to install a solar thermal unit.
Then, do you have problems with houseplant pests?
Jenn gives advice on how to get rid of them... and Nathan helps a homeowner get better access to their attic by installing pull-down stairs on "Ask This Old House."
♪♪ Ross: Hi, I'm Ross Trethewey, and welcome back to another episode of "Ask This Old House."
When most people think about solar, they think about photovoltaic panels or solar electric panels that takes the sun's energy and convert it into electricity.
There's also solar thermal, which uses the sun's energy to create heat or hot water used for domestic hot water or pool heating.
But today, we're headed to a homeowner's house to help them upgrade their water heater, and we're going to be using a new technology that pairs up heat pumps with solar thermal collectors, and we're really excited to help them out.
♪♪ You must be JC.
JC: Hi, Ross.
Welcome to our home.
Ross: Yeah, we're glad to be here.
You wrote in about a water heater upgrade and trying to get more efficient.
So tell me about that.
JC: So we use exclusively oil here, and because of that we -- our water heater is all electric and it's not very efficient.
Ross: Sure.
JC: So I'd like to upgrade to a more efficient water heater if possible.
Ross: Right.
So you got an oil system for space heating, and you have a traditional electric water heater for domestic hot water.
JC: That's correct.
Ross: Got it.
Okay.
Well, I got a jump start on it, and I reached out to a local company that specializes in energy-efficient water heating options.
He's gonna help us out today.
JC: I think he's in the basement already.
I can take you there and meet him.
Ross: Alright, let's go.
JC: Thank you.
Ross: Hey, Bruce.
Good to see you.
Bruce: Morning, Ross.
Ross: What's going on?
Bruce: How are you?
Ross: Alright, so, did you get a lay of the land here about what's going on?
I see the oil boiler, see the electric water heater.
Bruce: Yeah, yeah.
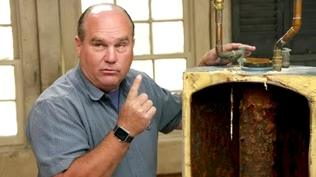
So in this house, the space heating is by oil boiler, and the domestic hot water is by what we call is a resistance water heater -- just a regular electric tank.
So there's an electric element in the top.
There's an electric element in the bottom.
This is the cold in from the street, and this is the hot out to the house.
Ross: Efficiency wise we're looking at...?
Bruce: So its efficiency is about one or a little bit less.
So a unit of electricity goes in, you get a unit of hot water out.
A dollar in, dollar out.
Ross: Okay.
So when you think about these, we think about upgrades and what can we do better, what are the other options out there.
Bruce: Right.
So hybrid water heaters.
Everybody's installing heat pumps.
As a matter of fact, in 2029 you're not going to be able to even buy these.
You're going to have to put a heat pump water heater in your basement.
Ross: Wow.
Bruce: So that's what we're talking about today.
Ross: So that's what I see over here, right?
Bruce: Exactly.
This is a conventional hybrid or heat pump water heater.
They're called air source because they take warm air from the room.
They harvest the energy through the compressor or the heat pump unit on top.
They take the warm energy out of that air, and then they blow cold air out.
Ross: So these units can operate where on the efficiency scale?
Bruce: The nameplate efficiencies are extremely high for some of these units.
They're like four.
But that's in a test condition.
You know, in real-world conditions it'll be between two and three depending on how cold the basement is and stuff like that.
Ross: Got it.
So if we're in a hot climate, you know, very warm, where you have air conditioning demands pretty much year round, this is a great solution, right?
Bruce: Yeah, it's a phenomenal solution.
In the South for example, there's a lot of water heaters in garages.
So some air conditioning and dehumidification in your otherwise hot and humid garage is a good thing.
Up here in the northeast where, you know, where there's space heating and you have to heat your home, it's not necessarily a good thing.
Ross: Right.
Alright.
So what other options do we have in a cold climate like this?
Bruce: So this is a split system, far less known, right?
Far less understood.
But basically instead of harvesting warm air from inside, there's an evaporator panel that gets mounted on the wall anywhere in the house and it'll harvest the heat from outside.
Ross: So that panel right there reminds me of a solar panel.
Bruce: Exactly.
Ross: You're mounting that outside?
Bruce: Yep.
Ross: And that is like the outdoor heat pump.
That's the evaporator panel, effectively, for a heat pump.
Bruce: Exactly.
So there's no effect on the conditioned space inside.
It's not blowing cold air.
You don't have to reheat anything.
And it looks like a solar panel, but what's happening is that the refrigerant -- All these units use refrigerant.
The refrigerant is going through the evaporator, and it's evaporating and gaining energy and going back inside to the heat pump unit, which has a compressor which ultimately makes the hot water.
Ross: So the usual common question I get is, so if it's 32 degrees outside or even colder, how does that thing work?
Bruce: Exactly, exactly.
So the efficiency of this is extremely high in the summer.
In the winter, the efficiency is less.
But all that means is that the heat pump unit itself, the compressor, runs longer, so lower COP in the winter, but still vastly higher than a regular electric water heater.
Ross: Sure.
Bruce: But on an annual basis, it'll be between two and three, in the high twos.
Higher in the summer, lower in the winter.
Ross: Got it.
So you increase the net COP compared to that... Bruce: Yes.
Ross: ...and you're way higher efficiency compared to that.
Bruce: Exactly.
Ross: So the cold climate like this, the fact that I don't have to have discharging cold air and putting that onus on the heating system, the fact that I can do that with an outdoor heat pump effectively with that panel, that really gives us that boost, and especially if the sun is shining on it.
Bruce: That's right.
So this thing is smart enough to know that when the sun is shining on it, oftentimes that panel doesn't see a lot of sun.
Sometimes it doesn't see any sun.
It's designed to work by convection, which means air movement.
If it happens to get some sun on it, then it's happier.
But the test conditions assume that there's no sun and there's no air movement, so it's meant to go on the back of a house and the landscaping and stuff like that.
Ross: Okay.
So, JC, the question comes down to which option -- what are you thinking about here for an upgrade?
JC: Well, this definitely sounds like a great option.
So let's do it.
Let's install this.
Ross: Alright.
Let's get to work.
Alright, Bruce, we'll help you out.
JC: Thank you, Bruce.
Bruce: Yeah.
First thing we do is we go in the basement.
We figure out where we place the new heat pump on the wall.
So we measure from the floor, we mark the holes, we hammer drill.
♪♪ And we put a level on it 'cause our heat pump needs to be level.
♪♪ And then a two-person operation, we hang the heat pump onto the bracket, and then we maneuver the storage tank next to the heat pump so we're not wasting space.
Electrical, the first thing you want to do is make sure that connections are safe, so that means that after you turn the breaker off.
And then we mount a new junction box.
The tank is in a different location, so we had to extend the conductors to the new location.
From that junction box we'll mount a new MC cable.
♪♪ From the junction box to the tank, we screw the covers back on the tank and the 4" square junction box, and then we test the circuit.
Next step, they removed the old tank.
They shut the water off.
They drained the existing tanks.
They cut some piping.
♪♪ They removed the old tank.
They wheeled it away.
Then they measured and cut and made connections to the new tank -- ProPress connections to the tank.
♪♪ On the refrigeration side, we're going to run the new line set through an exterior wall penetration.
We connect our line set to the heat pump, then to the evaporator panel outside.
We test with nitrogen for leaks, and we perform a refrigeration triple vacuum to get all the non-condensables and moisture out of the system to make sure that the system runs as cool as possible and as efficient as possible.
♪♪ Ross: Alright.
The system is on.
The tank is filled with cold water.
The heat pump is operational.
We're in business, right?
Bruce: Exactly.
So this panel that we screwed it to the wall, it's got nice stainless steel screws.
It only weighs about 10 pounds.
Our line set goes through this nice line hide, and then our heat pump is about six feet away on the wall here.
So there's a nice short line set length.
Ross: Nice.
So panel is made of aluminum, powder coated.
Bruce: Yeah.
Ross: No moving parts out here.
Bruce: Exactly.
It can't rust.
It can't do anything.
It'll last indefinitely.
Ross: Nice.
JC: And, Bruce, I see frost on the panel.
Is that normal?
Bruce: Yeah, it is normal.
And it makes us happy because that means that the refrigerant is coming out at relatively low pressure and it's very cold.
It's cold enough such that the moisture in the air is condensing on it and freezing.
That means it's doing its job.
There's no defrost cycle.
This will run until it's 20-below Fahrenheit.
JC: That's amazing.
Ross: I also brought an infrared camera.
So on this infrared camera here, and you can see that panel is averaging around 20 degrees.
So all the hot, you know, humid air, that 50-degree air that we see is actually condensing and creating frost on that surface.
So that means it's actually working.
Bruce: Exactly.
Face change is good.
Ross: Bruce, as far as efficiency, you know, what will JC save compared to his old electric water heater?
Bruce: So it's about a third, right?
The coefficient of performance or efficiency of these systems is about three.
Your electric water heater is about one.
JC: That's great.
Ross: That's cool.
And insulation cost wise, how does this compare if he went with the centralized, you know, traditional heat pump water heater?
Bruce: Yeah.
So our company installs both.
We install, you know, the conventional unitary heat pump water heaters, and we install these, of course.
You know, we think everybody should have a heat pump water heater.
But at the 80-gallon size, this is actually slightly less for us, and in most cases in Massachusetts it makes more sense.
Ross: Well, Bruce, this is great.
Thank you so much for your help today.
Bruce: Thank you.
Ross: That was awesome.
JC, you happy with everything?
JC: Thank you, Ross.
Yes, I am.
Ross: Awesome.
JC: Thank you, Bruce.
Bruce: Thank you, JC.
Ross: Alright.
Until next time.
Bruce: Cool.
Ross: We'll see you.
♪♪ Kevin: Hey, Jenn.
Jenn: Hey, Kevin.
Kevin: Oh, boy.
I'm seeing more bottles than plants.
What are we -- What are we talking here?
Jenn: This is the doctor section of the show.
Kevin: Okay.
Jenn: So we're talking about houseplants.
A lot of times, people don't know what to do when certain types of bugs come in, right?
Kevin: So, pest control.
Jenn: Yeah, there are solutions if you catch it early.
Okay?
Kevin: Yeah.
Okay.
Jenn: Okay, so let's start talking with mealybugs.
Kevin: Let's.
Jenn: They're like a white cottony bug.
Right?
They're usually found at the base of the stem.
This one I know started in the new growth and it migrated up.
And what they do is they pierce the plant and they suck out the sap, and then they create this substance called honeydew.
And then after they have the honeydew, it's like this sticky substance that's left on the leaf, and that promotes something called sooty mold, which is black, like a black spotty that you would notice over the plant.
Kevin: So a double whammy.
So the sucking of the sap is no good, but then that black mold that can grow because of it, no good.
Jenn: Correct.
Kevin: Okay.
Jenn: So what we have to do is attack the mealybug.
Don't worry about the mold because it's caused by the mealybug.
Kevin: How do we attack the mealybug?
Jenn: So first of all, try washing it off first with just water in the shower or sink.
Spray it down.
Physically try to remove it.
Kevin: Just wash them away?
Jenn: Yep.
If that doesn't work, take a mixture of rubbing alcohol and water, spray it down, and then see if you can wipe them off.
Last resort, use neem oil.
This is also a great product and it's organic product.
It's derived from a seed from a tree.
Some people don't like to use it because it has a little bit of an odor, but -- Kevin: It's effective.
Jenn: Very effective.
Kevin: And so when I hear "oils," I think of it as sort of as not poisoning the bug, but kind of encapsulating it so it can't... Jenn: It'll cover and suffocate it.
Kevin: Suffocate it.
Okay.
Alright.
Jenn: So that's that.
And then for other plants, such as the succulent, the mealybugs like to hide in little cracks and crevices.
So take rubbing alcohol with a cotton pad.
Go like this.
And then just physically pull them off.
Kevin: And the alcohol is not going to hurt the plant?
Jenn: It shouldn't, but do a test spot on the backside.
Kevin: Because I like mine with a little bit of tonic, but I get it.
Jenn: [ Chuckles ] Kevin: Alright.
What's going on with this plant here?
Jenn: This plant has spider mites.
Kevin: Ooh.
Jenn: So spider mites are a little bug that crawls around.
You could see they start to create, like, a web, right?
Spider.
Therefore the spider.
Kevin: Yeah.
Jenn: You can barely see them with the human eye, but they are visible.
Kind of like... if you look at that leaf.
Kevin: So you can't necessarily see the bugs, but you can see... Jenn: Yeah, but I know they're there because of the webs.
And then also because the spotting on the leaves.
You have yellow and brown spots.
It doesn't look like a healthy plant to you, does it?
Kevin: Not at all.
That one, I can tell, is not doing well.
Jenn: Right.
Kevin: And what causes spider mites to show up?
Like, why are they going after a particular plant?
Jenn: One reason why spider mites show up is very dry conditions.
If your plant is dry, dry, dry all the time, it's perfect environment for spider mites, so... Kevin: So proper watering could be preventative.
Jenn: Yep.
Keep your soil moist and appropriate, but not soaking wet.
Kevin: Right.
Jenn: It's all the balance.
Kevin: How do we take care of spider mites?
Jenn: Well, start with spraying with a solution of dish soap and water.
Dilute the dish soap, spray it on.
And just like these guys over here, it suffocates it.
So soapy water.
Spray it on.
And if that doesn't work, go to the neem oil again.
Either one will work fine.
Kevin: Very good.
What are you trying to show us with this?
Jenn: Here we have fungus gnat problem.
So what's a fungus gnat?
It starts with the larvae in the soil.
And once they grow up to be an adult, they start to fly around.
Kevin: Which you can see, right?
Jenn: Right.
Kevin: Because I do see gnats everywhere.
Jenn: I saved you one, this guy, that... Kevin: You caught one?
Jenn: Yeah.
So this is -- It's a sticky trap, right?
Kevin: That's one of the remedies?
Jenn: Yeah.
Kevin: Yeah?
Jenn: You just stick it in, they fly, they hit, and then they get stuck.
Kevin: Look at you, ninja warrior.
Jenn: That could be used for any of these insects that fly around, a little sticky trap.
Um, another thing very important is to kill the larvae inside of the soil.
This is a natural granule that is a natural pesticide.
Um, so you mix it with water, apply it to the soil, and then it will kill the larvae.
Kevin: That's interesting.
Big words.
Says "kills mosquito larvae."
Jenn: Yes.
Kevin: "Kills mosquito larvae, but also the gnat larvae."
Jenn: Yep, so if there's that outside, you can use that for treatment as well.
Kevin: Cool.
Okay.
So that's how we get rid of them if they show up.
How do we prevent them?
Like, stop them from ever even showing up?
Jenn: That's a good question.
So with the fungus gnats, this is caused by too much moisture in the soil.
The fungus gnats love a moist environment, so -- Kevin: So don't over water.
Jenn: Don't over water that.
This one is the exact opposite.
Spider mites like a dry environment, so... Kevin: Don't underwater.
Jenn: Don't underwater.
So know your plants.
Kevin: [ Indistinct ] Okay.
Jenn: And know what soil to use and have a well-drained pot.
Kevin: It's a pretty good rule of thumb, right?
A healthy plant that's taken care of is going to prevent them from wanting -- the bugs from wanting to get there.
Jenn: Yeah.
Kevin: So keep them healthy.
Inspect them.
Very nice.
Awesome.
Thank you, Jenn.
Jenn: Yeah.
You're welcome.
♪♪ Nathan: Hey, Danilson.
Danilson: Hey, Nathan.
How's it going?
Nathan: Good.
Nice to meet you.
So you wrote me about access to an attic space?
Danilson: Yes.
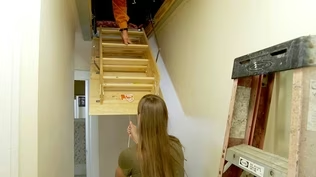
So right now, all we have is this small hole.
Nathan: Oh, yeah.
Danilson: And in the future, we're thinking about getting heating and cooling.
Nathan: Okay.
Danilson: So we had some contractors come in, and they told us to get something a little bit bigger.
Nathan: So kind of a small spot, also kind of in an awkward space, right, right here next to the stairs.
Danilson: Yeah.
Nathan: Go down.
Danilson: Whenever I set up the ladder, I do feel uncomfortable being close to the stairs.
Nathan: I don't blame you.
Well, it's cool you already got the kit.
It's definitely a two-man job.
You got a spot you want to put it?
Danilson: Yeah.
I was thinking about putting it in front of this light.
Nathan: This light over here?
This does seem like a good spot right here.
Danilson: Yeah.
So I was already in the attic.
I moved around some insulation.
Nathan: Okay.
Danilson: I noticed that the joists do run this way, so I think it's a good spot.
Nathan: Perfect.
I'm gonna hop up there and take a look, and we'll get started.
Danilson: Okay.
Nathan: Alright.
This is a great spot.
Nice and open.
No plumbing.
No electrical.
Danilson, what was the size of that unit?
Danilson: It's 22.5 by 54.
Nathan: Nice.
So we got 25.
And 54.
That's perfect.
That'll fit right in.
All we have to do is close down this opening a little bit, create our new rough opening.
But we don't have to cut anything.
Danilson: Okay, great.
That sounds good.
Nathan: Alright, Danilson, I'm going to drive a screw down next to this existing ceiling joist right here in this corner.
I want you to go over, take a look and see where it lands.
Danilson: Okay, I see it.
Nathan: You see it?
Alright.
I'm going to go down a little bit further, and I'm going to put another one in.
Danilson: Okay.
Okay.
I see the second one.
Nathan: Alright.
I'm gonna come down and take a look with you.
Alright.
Now we have something that we can measure off of.
Let's see what we're working with.
Danilson: Okay.
Nathan: So over here, off this partition wall, I have about 38 and 1/8.
And then coming back over here, I have about 38 and 1/4, so not too bad within 1/8.
And then I know I want to come off this back screw.
My rough opening is going to be about 55 inches, so we're not too close to the light.
This area is going to work out really well.
The ladder's got a great area to land.
I can go up.
I'm going to start framing out that rough opening, and then we're going to cut that hole open, but we're going to create a lot of dust.
So if you want to set up protection, you work on that, I'll work on that, and then we'll cut it open.
Danilson: Okay.
Sounds good.
I'll take care of it.
Nathan: Alright.
♪♪ Alright, to start framing down my opening to receive the ladder, I'm going to add two 2x4s down here.
I'm going to fill in.
They're going to be 25 inches long.
♪♪ I put two more down there.
I'm going to add this 2x4 to the edge here, and that will drop the spacing down to 23.5 inches.
♪♪ Alright, so we have all our four corners located.
And I'm going to use a piece of 1x4.
It's going to do two things for us.
It's going to create a straight edge from screw to screw, but also it's going to compress your ceiling together because you have wood lath, plaster, and then I believe another skim coat of sheetrock.
So probably half-inch piece of sheetrock below that.
So it's going to compress everything together as we cut.
There's a lot of vibration, and that old plaster and lath always likes to break up.
So we're going to try and minimize any of the repairs needed.
[ Saw whirring ] You're good.
[ Saw whirring ] Perfect.
Good job.
We're going to cut the ceiling into two sections so it's easier to pull down.
[ Whirring stops ] Alright.
Passing down.
Ready?
Danilson: Yeah.
Nathan: Okay.
You got it?
Danilson: Yep.
Nathan: So, just as we thought.
You have your wood lath.
You have your horsehair plaster.
You can see all the fibers.
And then they skimmed the ceiling with half-inch sheetrock there and then plastered over that.
So a lot of layers.
So it's nice to sandwich everything together for that clean cut.
Danilson: Okay.
Nathan: One more cut and we're done.
[ Saw whirring ] Alright.
Oop.
Got it?
Danilson: Got it.
Nathan: Alright?
Down to you.
Nice job.
Danilson: Thanks.
Nathan: Alright, what we're going to do now is we're going to take some 1x4, and we're going to do a couple of cleats across the bottom here.
That's going to allow us to bring that ladder back, put it in.
It's going to lower down, and it's going to sit nice and flush with your ceiling.
Alright.
How's that look down there?
Danilson: It looks pretty good.
Nathan: I'm going to shim it, screw it, and then we can open it up.
Danilson: Okay.
[ Screwdriver whirring ] Nathan: Let's take a look and see how it turns out.
So that goes down.
Looks pretty good coming through here, but then we got a big gap right there.
So, typically these ladders do come long and you cut them to fit your space.
If it was a little too short, we would adjust these brackets up here to try and make that drop more.
But I think the solution for here is we got to cut those legs.
To do that, I'm going to flip this up out of the way.
I am going to project my tape down, and I'm going to grab one measurement off the back.
So projecting that leg down 32 inches.
So I'm going to hook on to that side... measure 32 inches.
And I'm going to make this a square cut, 90 degree.
Because once we put our feet back on -- remember those feet have that angle to them?
-- the feet will go back on, slide up, and we'll stop at that 32.
Danilson: Okay.
[ Saw whirring ] Nathan: Let's see how we did.
Flip it up.
Put it down.
Nice and tight.
Nice and tight.
Wanna give it a try?
Danilson: Yep.
Nathan: Nice and sturdy?
Danilson: Yeah, it feels pretty good.
Nathan: Alright.
Awesome.
If you want to go and cut all the shims, we'll trim it out, insulate it, and then we're done.
Danilson: Okay, I can do that.
♪♪ Nathan: Alright, outside, I put together this picture frame with some 3 and 1/2 inch colonial casing.
So what we're going to do is we're gonna hold it up.
There's going to be just a little bit of a reveal.
♪♪ ♪♪ Alright.
Now I'm going to insulate the opening.
♪♪ And I'm adding an insulated attic access cover that will help reduce energy loss.
♪♪ Alright.
Push this all the way down.
Drop this.
I think you are good to go.
Danilson: Yeah.
Thanks for your help today.
I think it came out really great.
Nathan: You're welcome.
A little bit of homework for you.
We'll paint the trim, tighten that up.
And then once a year, oil these hinge points, and I think you're good to go.
Danilson: Okay.
I can manage that.
Nathan: There you go.
Danilson: Thank you.
Nathan: Nice to meet you.
Danilson: Same here.
Take care.
♪♪ Kevin: Next time on "Ask This Old House," Nathan and Lee team up to bring some curb appeal to a homeowner's front yard.
Nathan: Put our top rail in.
Man: It just looks amazing.
Kevin: Then Mauro is talking paint spills and how to clean them, and Heath gives a lesson on how three-way switches work.
What do I screw into what?
Heath: It looks confusing, but let me try and make it as simple as possible.
Kevin: All that on "Ask This Old House."


- Home and How To

Hit the road in a classic car for a tour through Great Britain with two antiques experts.


Support for PBS provided by:
Funding for Ask This Old House is provided by The Home Depot, Renewal By Andersen, and ChipDrop.